martes, 29 de enero de 2013

AVAL KESARI / POHA KESARI

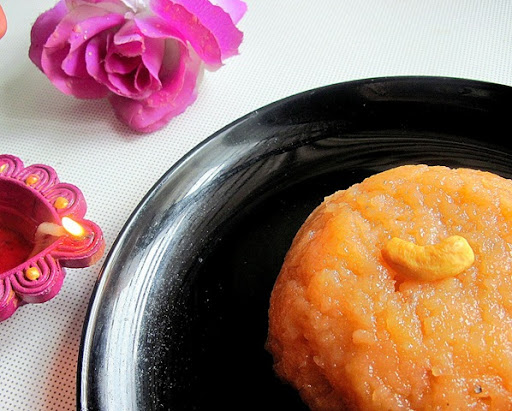
I came to know about this kesari from my school friend Swarna.It was very new to me because i've tasted kesari made with rava / semiya. When she told about this i found it interesting. I made for my friday pooja . It came out well and tasted excellent. We loved it.Its very simple to do. Try this and let me know ladies !!

AVAL KESARI 1

INGREDIENTS

  • POHA / THICK AVAL - 1/2 cup
  • Sugar - 3/4 cup ( Add  1 tbsp less if u want mild sweet)
  • Water - 3/4 cup ( U can replace water with milk too )
  • Ghee - 2 -3 tbsp
  • Cardamom powder - 1/4 tsp
  • Cashews - A few
  • Orange -red food color / Kesari color - a pinch

METHOD

  • Heat a kadai with a tbsp of ghee and fry the cashews. Remove and set aside.
  • Now add the aval/poha in the same kadai and fry till it gets roasted with a nice aroma.U can add another tbsp of ghee while roasting.
  • Now soak the roasted poha in little water for 10 mins to make it soft. This enhances quick cooking. ( Add the water just to cover the poha)
  • Take the measured water in a bowl by adding food color.Allow it to boil
  • Now add the roasted poha and Cover cook for 10 mins stirring in between.
  • Once the poha gets cooked, add sugar and mix well.
  • Add a tbsp of ghee at this stage. Mix well.
  • Stir constantly for few minutes ( may be 10 - 12 mins).At one stage the kesari becomes non sticky and leaves the sides of the pan.
  • Add the roasted cashews and cardamom powder . Mix well and transfer to a bowl .

Serve hot !!

aval kesari

TIPS :

  • I wanted mine to be mushy .So i soaked poha for more time and added 1/4 cup more water while cooking .
  • Here I've mentioned the actual ratio given by my friend.So adjust the sugar & water ratio accordingly .
  • Add more ghee while u make for ur guests ;)


sábado, 26 de enero de 2013

Under-the-highchair-mat

Shortly after I wrote about gift ideas for parents of babies just starting to eat, I discovered a long forgotten piece of oil cloth in our storage closet. It definitely helps to keep the floor a bit cleaner during feeding time.

Bread Baking Babes - Stromboli

Elle from Feeding My Enthusiasms was the lucky lady to choose our bread for May, and she chose the Stromboli.


The stromboli is a sandwich in every slice - meat and cheese layered on a lovely bread dough, rolled up and baked. The recipe is straightforward to make and the results are delicious.


Our stromboli was layered with proscuitto and salami and swiss cheese and basil.  I rolled it up as tight as I could, sprinkled it with salt and baked it.


Unfortunately I forgot the apparently critical step of piercing the bread before cooking, presumably so your bread doesn't bake up hollow like mine did.


Regardless of the big air pockets in the bread, it was delicious. As Elle mentioned in her post to us Babes, this is a perfect picnic food. If the warm weather decides to stick around, maybe we'll find out!

Please visit Elle for the recipe, and all the deets on being a Buddy with her delicious pick. And please visit the participating Babes (listed over on the left) to see their breads as well.

Cheers!

jueves, 24 de enero de 2013

http://feedproxy.google.com/~r/blogspot/sBff/~3/uxLTanvnZXg/lettuce-entertain-you-and-get-to-know.html

This quick and dirty video recipe for grilled romaine hearts was shot on location at Tanimura & Antle, a family-owned lettuce farm we toured as part of the Get to Know a California Farmer field trip Michele and I just returned from in Carmel, CA.

The event was to introduce their website and, as the name implies, help us get to know a farmer, and that's what we did. We got a fascinating look into how lettuce gets from their farm to your table. Brian Antle, the farm's Harvest Manager, ran the tour, and it was a joy to hear him talk with such pride about what his and the Tanimura family had created from this land. 


After the tour we were treated to a wonderful lunch showing off some of the farm's famous foliage. The grilled romaine salad you'll see in the video was a big hit, but we also had some beautiful pizzas, as you can see below. It always feels special to eat produce that was just picked hours before.


You'll also see a short video I did showing how the lettuce goes from dirt to final packaging on this slow-rolling mobile processing plant. You'll have to pardon the dirty lens, as I hadn't planned on filming in the field, and never checked it. I believe the smudge is gumbo, but there's really no way to tell for sure. Don't let that deter you, or you'll miss a cameo by social media guru, Jay Baer, on a bed of lettuce.


After lunch we got to tour Naturipe Farms, one of the largest berry producers in the state. Our guide, Tom, did a great job of explaining all the challenges that go into growing berries, especially strawberries. I learned that organic doesn't mean that no pesticides are used. They just need to be certified pesticides, and are often the same ones used in conventional farming. The highlight for me was his explaining how fish meal is regularly used to fertilize organic strawberries, unbeknownst to most vegans we assumed.


Anyway, it was a really fun trip, and I want to thank Adfarm and Get to Know a California Farmer for inviting us. Also, huge thanks to the farmers who shared their stories and delicious products with us. For more information on Get to Know a California Farmer, please check out their website! It's a fantastic way to connect directly with the people growing the food you put on your tables every day.

They're also running a sweepstakes on the Facebook page where you could win $10,000 worth of groceries. It's only open to California residents, and ends soon, so get over there and check it out. Enjoy!

Grilled Romaine Salad

How Lettuce is Harvested

http://feedproxy.google.com/~r/blogspot/sBff/~3/8vId0d_HhhE/spatchcock-chicken-tease.html

miércoles, 16 de enero de 2013

Peach Blackberry Cobbler Recipe

Peach Blackberry Cardamom Cobbler
Is there a more old-fashioned word than cobbler or cobbled? It brings to mind a shoemaker in a Hans Christian Andersen fairy tale or those stone streets in Europe (the ones that are so treacherous if you're wearing high heels). Just the word alone is quaint, charming and feels handmade. Which of course brings me to the culinary version of cobbler. A cobbler is basically sweet biscuit dough formed into tiles and 'cobbled' together on top of baked fruit. It's the kind of thing you can make year round, just varying the fruit with the season. Because it's so chilly in San Francisco in August, it's really the perfect dessert at the moment. We'll have to a while longer before making ice cream I'm afraid.

My most recent cobbler combines organically grown peaches I got from my friend Gayle who annually adopts a tree from the writer and farmer Mas Masumoto, dark as night blackberries from Driscoll's and a spice I am crazy about, cardamom. I recommend combining a couple types of fruit, it makes the cobbler prettier thanks to the contrasting colors, but also adds more texture, complex flavor and sweetness. I also recommend adding a bit of spice. If black pepper and mint had a love child, it would be cardamom. It's an exotic and aromatic spice, common in both Indian cuisine and in Nordic baking. I added a touch of it to both the fruit and the biscuit topping but it's still very subtle.

This cobbler is based on a Sara Moulton recipe. She makes a scaled down version that bakes in a one quart pan in the toaster oven (I use an 8x8 inch pan instead). It's really smart for small households because cobbler is best fresh from the oven. In fact, if you preheat the toaster oven and then get cooking I find it reaches temperature just at the point the cobbler is ready to bake.

Note: You can blanch and peel the peaches if you like, but I prefer leaving the skins on.

Peach Blackberry Cobbler
Makes 4 servings

4 peaches, cut into 1/4 inch slices
1 1/2 cup blackberries
3 Tablespoons sugar
1 Tablespoon cornstarch
1/8 teaspoon cardamom

Topping
1/2 cup flour
1 1/2 teaspoons sugar
1/2 teaspoon baking powder
1/8 teaspoon baking soda
1/8 teaspoon salt
1/4 teaspoon ground cardamom
2 Tablespoons unsalted butter
1/4 cup buttermilk plus more for the tops of the biscuits
1 teaspoon turbinado sugar

Preheat oven to 375 degrees. Combine the peaches, blackberries, cornstarch, cardamom and sugar and toss gently to combine. Transfer to an 8 inch square baking pan.

In a bowl combine the flour sugar, baking powder, baking soda, salt and cardamom. Cut in the butter using a pastry blender until the mixture resembles the texture of small peas. Stir in the buttermilk to form a soft sticky dough. Knead into a ball then turn out onto a well-floured work surface and roll to a thickness of about 1/2 inch. Use a biscuit cutter or wine glass to cut out 4 biscuits gathering the trimmings and rolling again as necessary. Arrange the biscuits over the fruit. Brush biscuits lightly with additional buttermilk using a pastry brush, sprinkle with turbinado sugar, and bake for 25 minutes or until golden brown. Serve warm with or without vanilla ice cream.

Enjoy!

Alaska Diary Day One

Welcome to Cordova, a remote Alaskan town Southeast of Anchorage. The population is around 2,000 people (though it swells to around double that in the Summer during salmon season). The life of the town is tied to the Copper River. Salmon fishing is not just an important part of the economy but a way of life.

It's a place where you go for a hike instead of going to the movies and host a potluck instead of making dinner reservations and wear Xtratuf boots all year round. People fish, forage, hunt. And the annual festivals celebrate things like salmon, wild berries and fungus (at the fungus festival you can win a prize for the best mushroom themed decorated pair of Xtratuf boots!). There are scientists, fishermen and processors, environmental advocates and a whole lot of overlap between them all.

Cordova is also the home of the Copper River/Prince William Sound Marketing Association, Alaska's first regional seafood development association and host of my trip.

Cordova Harbor
'In Alaska, you are never more than 5 minutes away from being cold and wet,' someone told me the night I arrived. And true enough, it was grey and drizzling when I landed on a connecting flight from Anchorage (you can only get to Cordova by flight or ferry).

stove
First thing after breakfast we head to the dining room of the Orca Adventure Lodge to meet our fishing guide. While we wait, what do we food bloggers get excited about? A massive 113 year old diesel powered stove named Bertha that we spy in the kitchen.

Chef Jeremy Storm
...and the engaging chef, Jeremy Storm, who told us about the challenges of shopping and cooking in a far off Alaskan outpost.

fishing
Intrepid food bloggers, we steeled ourselves and cast our lines. The zen of fishing is irresistible. You are at one with nature and catching a fish doesn't even matter. The only one that got pulled from the water by a neighboring fisherman got thrown right back in but it provided a little excitement all the same. My fish? He got away!

Copper River Fleece
Alaskan haute couture aka Copper River Fleece.

restuarant
Does this tell you how important restaurant culture is in Cordova? (note the spelling on the sign)

Baja Taco
I was told by a fisherman that the favorite wine in Cordova is 'Take me to Hawaii!' I think most folks will have to settle for Baja Taco, even though it's only open during the Summer.

salmon tacos
The tacos are filled with Copper River salmon, but of course.

Pat McGuire
When not catching fish or eating them, you can print with them, especially if you get instructions from local gyotaku artist Pat McGuire.

Note:The unwitting model in the photos is none other than Joelen of What's Cooking Chicago?, another blogger on the trip.

A huge thanks to Copper River/Prince William Sound Marketing Association for hosting me in Cordova. If you enjoyed this post, check out Day Two...